Local dictation on an Apple Silicon Mac now has several credible routes. The hard part is choosing between models, stacks and apps without pretending one RAM table settles the answer. The practical path is four steps. Check the exact Mac and workload. Shortlist models your chosen runtime actually supplies. Choose the route that matches your tolerance for setup: a packaged app, a script, or a library. Then prepare for offline use while you still have a connection, because the standard setup for each route downloads a model before it can transcribe locally.
The decision rule in four steps
Here is the rule this guide is built around. It applies to an M1 MacBook Air and an M4 Pro alike, but the result depends on the runtime, model package and workload as well as the chip.
- Check your hardware and workload. You want Apple Silicon for the routes covered here. Memory matters, but model packaging, runtime and the apps already open determine the pressure you will actually see.
- Shortlist models your route supplies. Start with the app or runtime's default, then compare one lighter alternative. Do not transfer whisper.cpp memory figures to a Core ML or MLX package with the same model name.
- Pick the route. A packaged local app if you want dictation to behave like a feature. A script or command-line tool if you want zero cost and full control. A library if you are building something.
- Set your offline expectations. Prepare the model while connected, then test the selected local route with networking disabled. Cloud features and operational requests sit outside that transcription test.
Each step below points to a deeper article in this series where the evidence lives.
Check the hardware first: Apple Silicon and RAM
Apple Silicon is the comfortable path for local Whisper. whisper.cpp lists Apple Silicon as a first-class citizen, optimised through ARM NEON, Accelerate, Metal and Core ML, while still supporting Intel and many other platforms. [2] The MLX framework and WhisperKit's Neural Engine path are built around Apple Silicon in particular. [4] [6] WhisperKit requires macOS 14 or later and Xcode 16 to build. [6] So the realistic question is not whether your Mac can run Whisper, it is how much of the model fits next to everything else you run.
Memory pressure is the constraint you will feel, but a model name does not give you one universal RAM figure. whisper.cpp documents runtime memory of roughly 273 MB for tiny, 388 MB for base, 852 MB for small, 2.1 GB for medium and 3.9 GB for large. [2] OpenAI's own README gives a different, larger set of "required VRAM" figures for its reference implementation, from about 1 GB for tiny and base up to 10 GB for large, because the reference code is a PyTorch pipeline rather than the lean C++ engine. [1] Keep the two tables separate, and do not use either as a requirement for a Core ML bundle or MLX checkpoint.
Community reports show why the exact implementation matters. One r/LocalLLM user on an 8 GB M1 MacBook Air reported that only Whisper tiny would load in their local dictation app. [8] MacWhisper's release notes tell its users that medium and large need more than 8 GB of RAM. [9] These are app-specific observations, not a general model-to-RAM rule. They are good reasons to test with your normal workload open.
For the full hardware breakdown across M1 to M4, including why chip labels do not tell you the memory story, read how much Mac you need for local dictation.
Pick a model your runtime actually supplies
Whisper comes in six sizes: tiny, base, small, medium, large and turbo, with English-only .en variants for the first four. [1] OpenAI describes turbo as an optimised version of large-v3 that transcribes faster with minimal accuracy degradation, and warns that turbo is not trained for translation; if you need speech-to-English translation, you use a multilingual model instead. [1] The English-only models tend to perform better for English, especially tiny.en and base.en, and Whisper's accuracy varies widely by language. [1] For a Mac user dictating in English, that points at the .en variants when your app offers them.
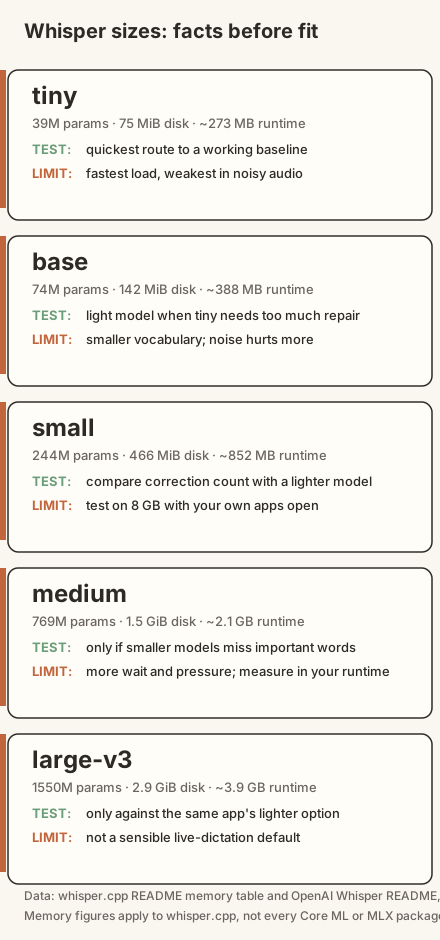
The chart keeps measured facts separate from the decision. Parameter counts come from OpenAI's README. Disk and runtime memory figures come from whisper.cpp and apply to that implementation. The TEST and LIMIT lines are prompts for a live-dictation trial, not benchmark results or hardware requirements. One community report describes small working well on an M1 MacBook Air with 16 GB, but that remains one user's result in one app. [10]
If your app supports large-v3-turbo, it is worth a comparison run against small on your own Mac, because return time is what you feel and published chip tables will not settle it for your machine. The full reasoning, including why the vendor benchmark tables do not transfer between apps, is in which Whisper model to use for live dictation on Apple Silicon.
Choose the route: packaged app, script, or library
The model is only half the decision. The same Whisper weights reach your cursor through three very different routes, and your tolerance for setup work should decide between them.
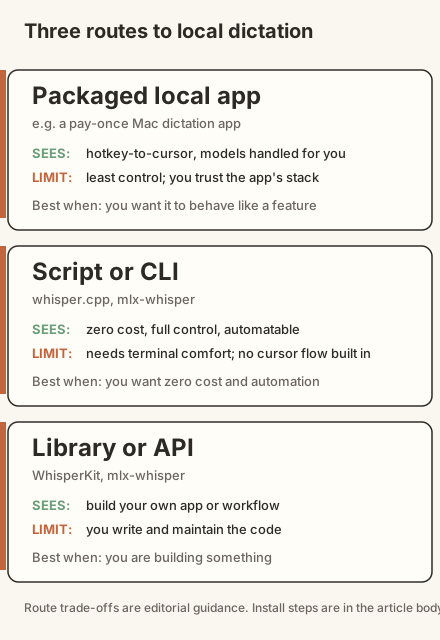
A packaged local app treats dictation as a feature: a hotkey, a recording indicator, text at the cursor. This is the lowest-friction route, and it is what most people should try first. One example is ShoutFlow, a pay-once Mac app for macOS 14 and later. Its local mode uses WhisperKit for transcription on Apple Silicon, with model choices from tiny up to large-v3-turbo, and the models download on first use; transcription itself stays on the Mac. [11] It also offers bring-your-own-key cloud cleanup to a range of providers if you want AI post-processing beyond the local model. [11]
A script or command-line tool costs nothing and gives you complete control. whisper.cpp is the canonical option: clone the repository, download a model with the included script, build with CMake, and run whisper-cli against a 16-bit WAV file. [2] It expects WAV input, so you convert first, for example with ffmpeg. [2] On the Python side, mlx-whisper installs with pip and transcribes a file with one command, pulling models from the MLX community collection on Hugging Face. [4] [5] This route has no cursor integration out of the box, so you pair it with a launcher, a hotkey utility or your own script.
A library is for building. WhisperKit is a Swift package that downloads and runs Core ML Whisper models, with a command-line app installable through Homebrew, and Argmax recommends the compressed large-v3 turbo variant for maximum multilingual accuracy. [6] mlx-whisper exposes the same transcription as a Python API, so you can embed it in your own tools. [5]
The route decision in detail, including the deployment-shape differences between WhisperKit, whisper.cpp and MLX, is in WhisperKit vs whisper.cpp vs MLX. If you are torn between an app and a script, the practical comparison is in running Whisper locally: script vs app.
What offline actually means
"Offline" is the most oversold word in local dictation, so set the expectations before you choose. The standard setup for every route in this guide fetches a model before local transcription can begin: whisper.cpp provides a download script for ggml models, [2] [3] mlx-whisper pulls MLX checkpoints from Hugging Face automatically, [5] WhisperKit downloads its recommended Core ML model when none is specified, [6] and ShoutFlow's public documentation says models download on first use. [11] In whisper.cpp, the files range from 75 MiB for tiny to around 2.9 GiB for large-v3, so prepare the chosen model while you have a reliable connection. [3]
Once the model is present, these local transcription routes can process audio without sending it to a cloud transcription service. That does not prove the whole app is network-silent: BYOK post-processing, cloud dictation, licensing and update checks are separate questions. Apple's own Dictation sits on another scale. Its current documentation says Keyboard settings show whether an internet connection is required and whether general text Dictation is processed on the device rather than sent to Siri servers. [7] Check the active language and setting on the exact Mac rather than assuming one rule covers every configuration.
For a deeper look at what a genuinely air-gapped setup requires, read offline and air-gapped dictation on a Mac. And if you are weighing Whisper against Parakeet as the engine underneath all of this, Whisper vs Parakeet for dictation covers that choice.
A test routine that tells you the truth
I have not run a controlled benchmark for this guide, and I would not trust one that claimed to rank every model on every chip from a single machine. What you can do in twenty minutes is more honest.
- Record sixty seconds of your own speech in your normal room, with your normal microphone.
- Run the same clip through the model your app offers, on the Mac you will actually dictate on, with your usual apps open.
- Repeat five times and note the delay from stopping speech to seeing text on the first run and after the model is warm.
- Count the corrections that change meaning, not the cosmetic ones.
- Watch Activity Monitor for memory pressure while you do it.
Whichever model returns text fast enough and needs the fewest important corrections is your answer. It may be smaller than the biggest model your Mac can load. Keep the result with the app version, model label and Mac configuration, because those details are more useful than a generic chip table when the software changes.